Power Apps Features for Developers: Top 10 Highlights

Power Apps is constantly evolving to provide developers with powerful tools to enhance productivity and improve app performance. In this blog, we’ll explore the top 10 features introduced in 2024 that every Power Apps developer should know about. From simplifying formula creation to enabling seamless collaboration, these updates are designed to streamline your development process.

1. Comment-Generated Formulas

This feature simplifies PowerFx formula creation by allowing developers to input natural language prompts. Whether you’re a beginner or an experienced developer, this feature reduces complexity and boosts productivity.

For example, you can input: ‘Filter the gallery to show items where the status is Active.’ Power Apps will automatically generate the corresponding formula: ‘Filter(GalleryItems, Status = “Active”)‘.

Availability: December 2024 (2024 Release Wave 2)

Reference: What’s new in Power Apps: October 2024 Feature Update – Microsoft Power Platform Blog

Power Apps Features for Developers

2. Real-Time Co-Authoring

Collaborating on canvas apps has never been easier! With real-time co-authoring, multiple makers can now edit an app simultaneously, just like in Microsoft Word or PowerPoint. This feature significantly speeds up development and fosters better teamwork.

Example: If you and a colleague are working on a canvas app, you’ll both be able to see each other’s changes in real-time, making collaboration seamless and efficient.

Availability: June 2024 (2024 Release Wave 1)

Reference: Work together in real time to create canvas apps | Microsoft Learn

3. Customizable Offline Profiles

Optimize your offline-enabled apps by selecting specific columns for each table. This reduces unnecessary data load, ensuring a smoother and more efficient experience for users, even when they’re offline.

Example: A field agent app that only needs a subset of columns can be customized to download only the essential data, reducing load time and improving offline performance.

Availability: December 2024 (2024 Release Wave 2)

Reference: Select columns downloaded on mobile devices | Microsoft Learn

4. Code View for Canvas App Functionality

Power Apps introduces a Code View that allows developers to inspect, share, and copy control code easily using a YAML-based format. This feature is invaluable for understanding app functionality at a granular level.

Example: To view the code for a specific control, right-click on it in the tree view and select ‘View Code (Preview)’. This makes it easy to share and modify control code.

Availability: October 2024 (2024 Release Wave 2)

Reference: Use code view for canvas app controls (preview) – Power Apps | Microsoft Learn

Visuals:

  • To view the code for a control, right-click the control in the tree view or directly on the screen, and then select View Code (Preview).

To add a new control from the copied code, right-click on the screen where you want to place the new control, and then select Paste Code (Preview).

5. WYSIWYG Data Modeling with Copilot

Create tables and relationships visually with Copilot’s WYSIWYG (What You See Is What You Get) data modeling feature. Copilot generates Entity Relationship Diagrams (ERDs), making complex data modeling easier and more intuitive.

Settings:

  1. Open Power Apps
  2. Invoke Copilot
  3. Create a Table
    1. Prompt
    1. Define Relationship
  4. Visualize Relationships
  5. Refine and Update

Example: With a few clicks, you can generate an ERD that visually represents your data tables and their relationships, making the process of creating and managing data models faster and simpler.

Availability: June 2024 (2024 Release Wave 1)

Reference: Visualize and work with complex data using copilot | Microsoft Learn

Visuals:

Describe the solution requirements.

The copilot will generate the ERD (Entity Relationship Diagram) based on the requirements

An AI-generated table containing sample data.

Drag and drop the entities to establish a relationship.

6. Seamless Pipeline Setup

Setting up deployment pipelines is now faster than ever. In less than 60 seconds, you can automate solution transitions between development, testing, and production environments, ensuring smoother releases and better version control.

Example: Set up a pipeline to automate your app’s deployment from development to production, reducing the risk of human error and ensuring smoother transitions.

Availability: June 2024 (2024 Release Wave 1)

Reference: Set up pipelines in Power Platform – Power Platform | Microsoft Learn

7. Canvas App Insights with Monitor

Monitor your app’s performance and get actionable insights to improve its functionality with the new Monitor tool. This feature helps identify issues and recommends improvements, ensuring a better user experience.

Example: After deploying an app, use the Monitor tool to check performance metrics and receive recommendations to optimize the app’s responsiveness.

Availability: December 2024 (2024 Release Wave 2)

Reference: Get valuable insights and recommendations for your canvas app using Monitor | Microsoft Learn

8. GitHub ALM Integration

With GitHub integration, Power Apps now supports Application Lifecycle Management (ALM), enabling developers to implement version control, continuous integration (CI), and continuous deployment (CD) workflows.

Example: By linking your Power Apps project to a GitHub repository, you can manage source code, automate deployments, and monitor testing processes in one unified platform.

Setting Up ALM in Power Apps with GitHub

  1. Create a GitHub Repository
  2. Install Power Platform Build Tools
  3. Export Solutions from Power Apps
  4. Set Up a CI/CD Pipeline
  5. Configure GitHub Actions
  6. Automate Testing
  7. Monitor and Maintain

Availability: September 2024 (2024 Release Wave 1)

Reference: Available GitHub Actions for Microsoft Power Platform development – Power Platform | Microsoft Learn

9. Smart Paste in Model-Driven Apps

Streamline data entry in model-driven apps with the new Smart Paste feature. This feature automatically suggests inputs based on the content copied to your clipboard, saving time and reducing manual entry errors.

Example: If you copy a list of addresses into your clipboard, Smart Paste will automatically fill out the corresponding fields in your model-driven app, making data entry faster and more accurate.

Availability: September 2024 (2024 Release Wave 1)

Reference: Use Copilot’s form fill assistance feature in model-driven apps – Power Apps | Microsoft Learn

Visuals:

The Smart Paste feature suggests inputs for the fields in the form by analyzing the copied text and the form structure.

To accept all suggestions on the open tab of the form, on the notification bar, select Accept all suggestions.

10. SQL Server Procedure Integration

You can now call SQL Server stored procedures directly in PowerFx without relying on Power Automate, simplifying the app development process and improving performance.

Example: The following PowerFx formula demonstrates how to call a stored procedure: ClearCollect(ResultCollection, SQLConnection.spMyStoredProcedure(param1: TextInput1.Text).ResultSets.Table1).

Availability: September 2024 (2024 Release Wave 1)

Reference: Call SQL Server stored procedures directly in Power Fx (Preview) – Microsoft Power Platform Blog

Example:

ClearCollect(
    ResultCollection,
    SQLConnection.spMyStoredProcedure(
        param1: TextInput1.Text
    ).ResultSets.Table1
)

Select the stored procedure, as shown in the image below.

Below is an example of reference code that you can use in the Power Fx formula bar

Conclusion

The 2024 Power Apps features offer developers powerful tools to improve efficiency, collaboration, and app performance. These updates, including real-time co-authoring, enhanced offline capabilities, and better integration with GitHub and SQL Server, will significantly streamline your development process and improve your app’s functionality.

Stay ahead of the curve by exploring these features today. For detailed guides and video tutorials, visit Microsoft Learn or watch the latest demo videos on Sysfore’s YouTube channel.

Power Apps: Unlocking Offline Capability for Robust Mobile Applications

Introduction

In today’s dynamic business environment, many professionals, especially those in field sales, service, and remote support roles, often operate in areas with limited or no internet connectivity. To ensure productivity and data integrity in such scenarios, applications need to seamlessly transition between online and offline modes. Microsoft Power Apps, a platform for building custom business applications, offers tools to achieve this. The challenge lies in enabling the mobile Apps to store data locally, monitor network connectivity changes, and synchronize data seamlessly when connectivity is restored, ensuring a smooth user experience and data consistency.

Power Apps Offline Capability

Problem Statement

Traditional applications often struggle to provide robust offline functionality, even custom-built native mobile applications with custom code can be unreliable at times due to network connectivity issues or device limitations. For professionals in industries such as manufacturing, distribution, engineering, and medical supplies, with large field sales, service, and support teams working in remote locations, the inability to access or input data offline can lead to significant inefficiencies and data loss. Challenges include remote inventory management, field service operations, and real-time data collection, all of which are hindered by connectivity constraints. A reliable offline-capable application must address these issues by:

  1. Storing data locally for uninterrupted access.
  2. Detecting changes in network connectivity.
  3. Synchronizing offline data with the server once connectivity is restored.

Dataverse vs. Collections: A Comparative Approach

Power Apps Offline Capability

Dataverse is the superior choice for building scalable, efficient Power Apps with offline functionality. It simplifies development, ensures a smoother user experience, and supports future scalability.

Solution: Implementing Offline Capability

To achieve offline functionality in Power Apps:

  1. Use Dataverse for data storage, leveraging its out-of-the-box offline capabilities.
  2. Configure offline profiles and sync filters to manage data access and updates effectively.
  3. Detect network connectivity status using built-in tools and trigger synchronization processes upon reconnection.

Video Demonstration

For a step-by-step guide to implementing offline capabilities in Power Apps Canvas applications, watch this video on Sysfore’s Official YouTube Channel.

Building responsive apps using Power Apps Canvas

What is a Responsive design?

Responsive design by the terminology means a dynamic or fluid design, which can adapt to any screen size irrespective of the device on which the end user is using the application. One of the key aspects when a customer looks at new application development is the capability to have a responsive design for the application responsive Power Apps Canvas, which helps them to give the end users same experience on a large screen like in a desktop, to a mobile device like in a mobile phone. The need of a responsive design is becoming critical in every customer decision making whether it’s a new custom development or even a platform driven development approach.

Microsoft Power Platform, a low code / no code application platform (NCAP) provides this capability in the rapid application development using Power Apps. The key thing to note is the fact that in a traditional development, such a responsive development would require a good amount of work from a UI/UX engineer working in detail using CSS. This approach reduces the time taken for such development. 

How to create an new App using Power Apps?

Steps to create App.

  • Go to chrome and type make.powerapps.com
  • It will lead to sign in, give credentials Email and Password to sign in.
  • Once you login in left hand side you can see different options such as Home, Learn, Apps etc.
  • Click on Apps.
  • Once you click on App on top you can see New app option.
  • When you click new app, you can see 3 options such as Canvas, Model-driven and Portal.
  • Select Canvas
  • It will lead to new tab where you can find 2 options for creating app (Please refer below screenshot).
    • Phone Layout and Tablet Layout in Blank App (you need to insert all controls)
    • Phone Layout and Tablet Layout in Template App (prebuilt templates will be given you can modify)
  • As we are building Responsive canvas app, please select Phone Layout as your preference (Blank or Template).
  • For more detailed information on creating app please refer: https://docs.microsoft.com/en-us/powerapps/maker/canvas-apps/get-started-test-drive

Power Apps has provided some new features enabled to make an app responsive. We need to follow below steps.

  • Once you create app you can find on top menu you can see File, Home, Insert, View, Action.
  • Click on File.
  • On left menu click on Setting
  • You can see one more menu list beside left menu.
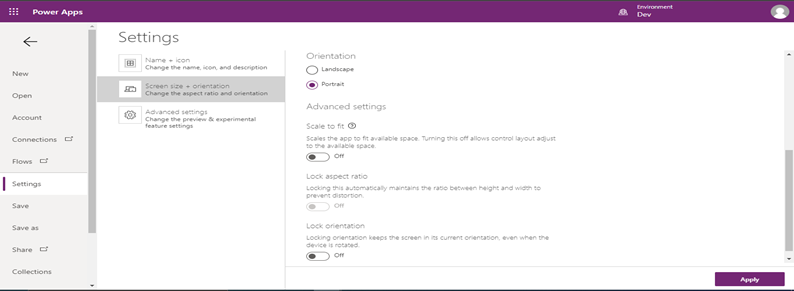
  • Click on Screen size + orientation.
  • Beside one more screen visible as shown in the below screenshot.
  • Off the Scale to fit, so that your app will fix to whichever window size.
  • Off the Lock orientation, so that it will not affect while your mobile rotation will be done.
  • To save the changes click on Apply and save the app and publish.
  • How to add screen and form?
  • To make the Form we are creating responsive, we need to follow below steps.
  • Click on Home option in top menu.
  • Click on New Screen
  • Click on Insert option in top menu.
  • You can see all different controls such as gallery, form, button, input etc.
  • Click on Form, you can see 2 options.
    • Edit
    • Display
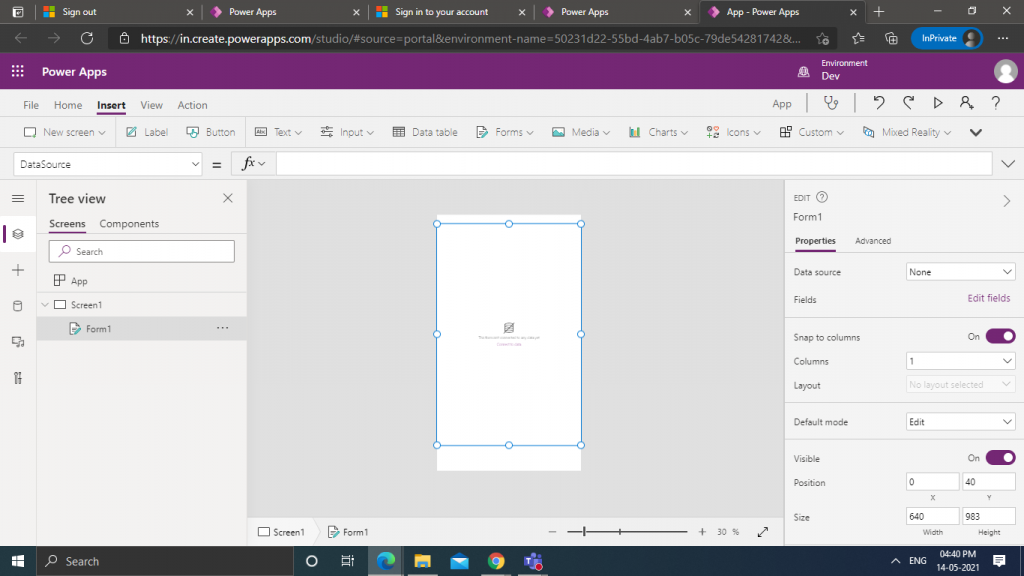
  • Select Edit Form

Once you insert form you can see as shown in below screenshot.

How to configure form

How to configure form?

  • You can find on right side Property name called DataSource.
  • Click on dropdown of DataSource.
  • You will get list of entities (Tables), you can select for which entity (Table) you want create form.
  • Once you add DataSource, below Datasource property you can see Edit fields.
  • You can select fields of form which is required.
  • In below you have one more property called Default Mode
  • Select Default Mode as New for the new form.
  • In form on left side, you can see Tree View.
  • You can see inside form DataCard.
  • In DataCard you will be having 4 controls
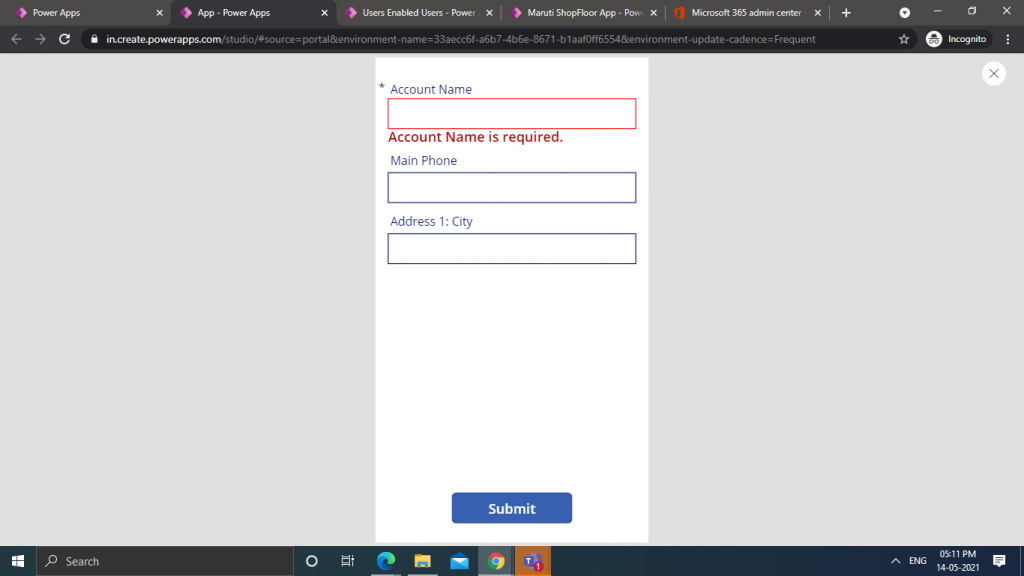
    • StarVisible – If the field in form is required then star will be visible.
    • ErrorMesssage – If the field is mandatory, without filling this field if you try to save, then error message will be shown.
    • DataCardValue – It is used to enter the data by end user (Depends on datatype)
    • DataCardKey – Name of your field which you have entered in your table.     

You can see below screenshot how it displays if you try to submit form without filling detail which is mandatory field.

How to make the form as Responsive?

  • Set Columns to 4 (So that we can see 4 field in single row for browser)
  • Set form width property as Parent.Width (Note: Width will automatically adjust to browser or mobile width)
  • Set form Height property as Parent.Height (Note: If give Parent.Height it will set to screen height, in below image I have given Parent.Height-250, so that we can place Submit button below)
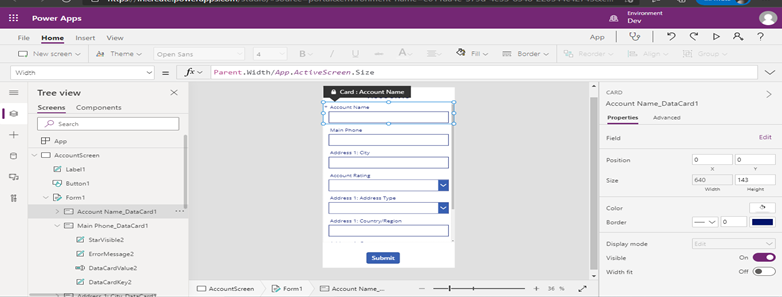
  • Select Datacard of your form.
  • Set DataCard Width property as Parent.Width./App.ActiveScreen.Size
  • Set DataCard Width property to all DataCard. (You can use Ctrl+A to select DataCard at a time)

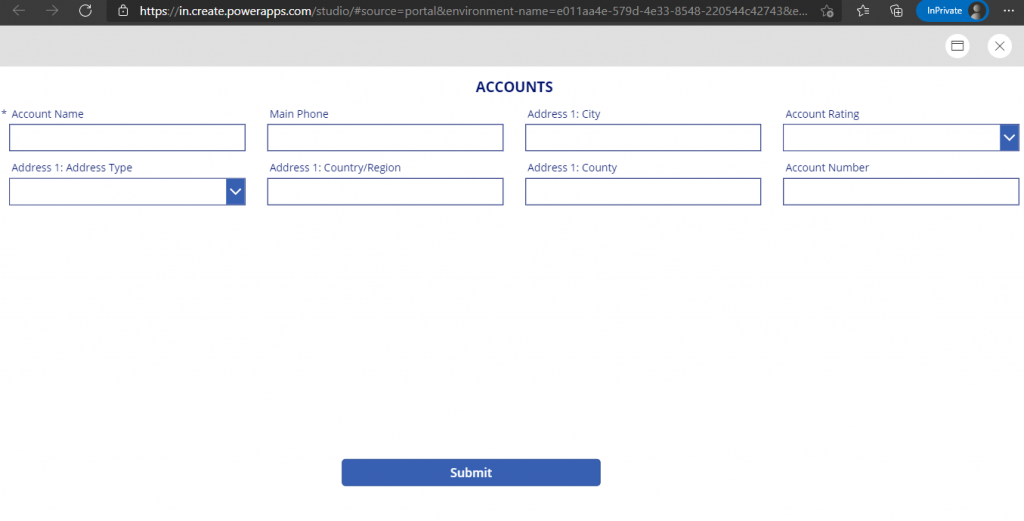
Once you done with above steps you can see your form as responsive.

  • The below screenshot shows your mobile app while playing it will set to browser width.
View – Laptop/Desktop browser

If you reduce to half of your browser, then the form will automatically adjust to your browser size.   

View – Tablet

If you reduce to Mobile size your browser, then the form will automatically adjust to your browser size.

View – Mobile Phone

Blog authored by Jeniviya M., Power Apps Consultant at Sysfore Technologies.

Also Read More about – Power Apps Platform

You can talk to one of our solution experts today to learn more about you can leverage Power Apps and the Power Platform in your organization.

Sysfore is a Microsoft Gold Partner with unique customer stories using the Microsoft Power Platform. Being a low code/no code platform, partner could help customer in quickly building apps for their key business challenges leveraging the various solution components. As requested sharing with you the solutions which Sysfore has already built on Power Apps platform for customers.

Get Sysfore Cloud Managed Services For Your Enterprise

Sysfore, A Microsoft Cloud solution provider and a Gold Partner, uses leading network, technology, and service expertise to deliver our service anytime, virtually anywhere, quickly and efficiently. We have helped over 80 small enterprises and 30 mid-sized enterprises across the globe for a successful cloud migration in the past 8 years.
Contact one of our experts today and we will help you find the perfect solution for your business. Write to us at info@sysfore.com or give us a call at +91 (80) 4110 5555.